Your first animation
Open the Swash editor, add text, give it motion with a preset, set the length on the timeline and export your first animation.
Swash runs in the browser. You do not need to install anything, and you do not need an account to start. This article takes you from an empty editor to an exported clip.
Open the editor
Open the editor. The editor needs a window at least 900 pixels wide. In a narrower window you see Open this on a computer instead; make the window wider and the editor appears. On a phone, the editor does not open, but you can still browse Community.
You can work as a guest or sign in.
- As a guest, the editor opens straight away on one project, My first animation, which starts with a demo you can change. Your work is saved in this browser. Exports carry a small Swash mark, and Publish asks you to sign in first.
- Signed in, your projects are saved to your account and listed on the Files page. To sign in, click Sign in in the top bar (tooltip
Keep your work and export without the watermark) and then Continue with Google.
If you changed the guest project, it moves into your account when you sign in, unless your free account already has 3 projects. A free account holds up to 3 projects. More than that needs Pro, see Plans and limits.
Find your way around
The editor has five areas. The numbers on the picture match the list below.
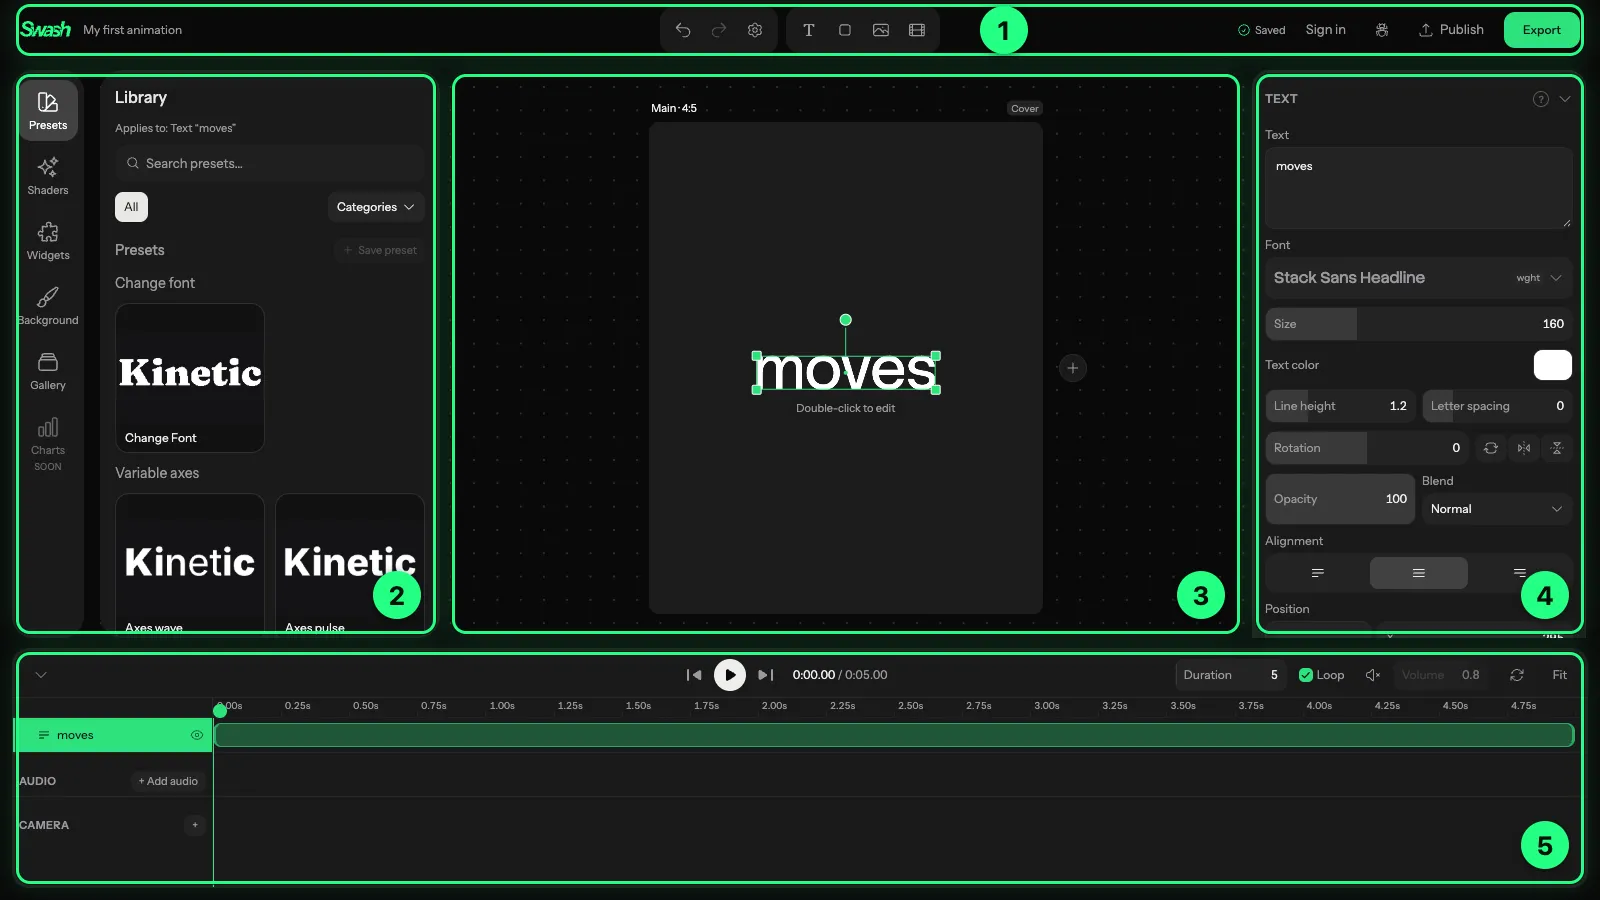
- Top bar. On the left: the back arrow (tooltip
Back to files, only for signed-in projects) and the project name. In the middle: undo, redo, the editor settings button and the buttons that add objects. On the right: the save status, Sign in for guests, Report a bug, Publish and Export. - Left rail. A column of sections: Presets, Shaders, Widgets, Background and Gallery. The section you pick fills the panel next to the rail. Presets opens the Library. See Effects and shaders and Widgets.
- Board. The middle of the screen. Your animation plays here. When the board has more than one artboard, the active one has a green frame.
- Inspector. The panel on the right. It shows the settings of whatever you have selected. With nothing selected, it shows Canvas, with Aspect ratio and Background.
- Timeline. The strip along the bottom. It lists every layer of the project, with the playback controls above it.
Click an object on the board or its row in the timeline to select it. Click an empty spot on the board to clear the selection.
Add text and other objects
The buttons in the middle of the top bar add objects:
- T (tooltip
Add text) adds a text layer. - The square (tooltip
Add shape) adds a shape. - The picture (tooltip
Add image) asks for an image file. - The film strip (tooltip
Add video) asks for an MP4 or WebM file. A video can be up to 30 seconds long and up to 100 MB.
The new object is selected right away, so the inspector shows its settings. You can also drag image and video files from your computer onto the active artboard.
To change the words, double-click the text on the board and type. Font, size and colour are in the Text section of the inspector, see Text and fonts.
Give it motion with a preset
- Select the object you want to animate.
- Click Presets in the left rail.
- Click a card in the Library.
Its layers appear in the Animators section of the inspector, where you can change timing and other settings. A second preset adds to the first one instead of replacing it. Cards marked Pro, such as most 3D cards, need Pro.
Presets and animators explains searching the library, combining presets and saving your own.
Play, scrub and set the length
The controls sit at the top of the timeline.
- The round button plays and pauses. When playback reaches the end, pressing play starts again from the beginning.
- The buttons on either side of it jump to the start and to the end.
- The clock next to them shows the current time and the total length.

To scrub, click or drag along the ruler above the layers. Scrubbing pauses playback. The marker at the bottom of the playhead also takes the keyboard: click it, then use ← and → to step by a hundredth of a second, hold Shift to step by a tenth, and press Home or End to jump to the start or end.
On the right of the same row:
- Duration sets the length of the scene in seconds. Drag the field or type a number, up to 600 seconds.
- Loop makes the scene repeat.
- Fit fits the whole length into the timeline.
The arrow at the far left of the row collapses the timeline when you need more room for the board.
Useful shortcuts
- Space plays and pauses. Hold Space and drag to move around the board.
- Cmd/Ctrl + Z undoes, Shift + Cmd/Ctrl + Z redoes.
- Shift + 1 shows the whole board, Shift + 2 zooms to the active artboard.
The full list is in Keyboard shortcuts.
Save your work
Swash saves on its own shortly after each change. The top bar shows Saving, then Saved. If it shows Not saved, the last change did not reach storage.
When you are signed in, the back arrow takes you to Files. It lists Your projects and a row of templates. Each project card has a menu with Open, Rename, Duplicate and Delete. Import .json brings in a project file, the kind you get from Export .json in the export panel.
Export and next steps
Click Export in the top bar, pick a format and size, and export. As a guest, every export except PNG carries a small Swash mark. Export covers formats, sizes and the watermark in detail.
Every project is a board that can hold several artboards, including versions in other formats such as 9:16. See Artboards and formats.