Effects and shaders
Add shaders to the whole frame or to one object, tune and reorder them, and use decorations, blend modes and background patterns.
A shader changes how pixels look: it adds grain, turns the picture into halftone dots, bends it like water or blurs it. In Swash a shader is a layer, with its own row in the timeline's list of layers. It works on everything drawn below it, so a shader at the top of the list covers the whole frame. You can also move a shader onto one object, and then it changes only that object.
Add a shader to the whole frame
- Open Shaders in the left rail.
- Click a card.
The shader is added as a new layer at the top of the list of layers and is selected. Because it sits above everything, it processes the whole frame, background included.
Each card shows a live preview of its shader. The grid has no categories, so scroll through it. There are film looks such as Grain, VHS and CRT, print looks such as Halftone, Risograph and Dither, distortions such as Water, Warp and Lens distortion, blurs such as Blur, Bokeh blur and Progressive blur, and colour tools such as Gradient map, Posterize and Adjust.
A shader layer only changes what is drawn before it. Drag it lower in the list of layers and the layers above it stay untouched. For example, put Blur between a photo and a headline to blur the photo and keep the text sharp.
To switch a shader layer off for a moment, click its eye in its row (tooltip Hide layer).
The Shaders tab has no Pro cards: every shader works without Pro.
Put a shader on one object
- Add the shader from the Shaders tab. It appears as a layer at the top of the list.
- In the list of layers in the timeline, drag the shader layer onto the row of the object, such as a text, shape, image or video.
The shader layer disappears from the list and shows up as a row under that object. Now it changes only that object, wherever the object is in the stack.
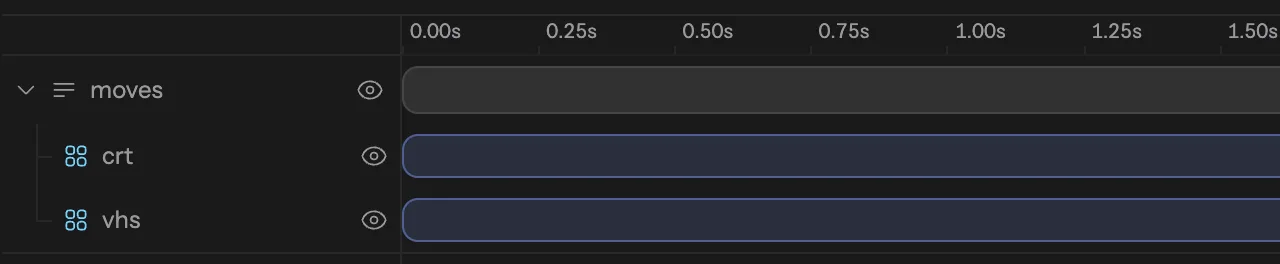
Drop more shaders on the same object to build a chain. The rows under the object run from top to bottom: the top one is applied first. Drag a row up or down to change the order.
Each row has its own eye, so you can switch off one shader in the chain without touching the rest. Each shader on an object also has its own bar in the timeline. Drag or trim the bar to choose when that shader is on.
To take a shader off the object, start dragging its row. A strip that reads Drop here to free the shader appears at the bottom of the list of layers. Drop the row there. The shader becomes a standalone layer again, placed just above the object, and you can delete it like any other layer.
A few limits:
- You can drop a shader only on a top-level object. Groups and widgets cannot take a shader, and neither can objects inside a group.
- You cannot drop a shader on another shader layer.
Tune a shader
Click a shader layer, or a shader row under an object, to open its settings in the inspector. The section is named after the shader, for example Halftone.
Every shader has its own controls, such as Amount, Size, px and Speed for Grain. Most shaders also have Mix, which blends the result with the original picture: lower it to make the effect subtler.
Some shaders start with a Preset list, for example Edge detect, Scatter, Emboss, Water and Shatter. Pick a preset to set all the controls at once. Once you change a control yourself, the list shows Custom.
Decoration and blend modes
Some looks are not shaders. They are part of the object itself and live in its sections of the inspector.
Decoration adds a finish to an object. Click the + next to Decoration and pick a card:
- Text can have Underline, Strikethrough, Plate, Outline, Background blur and Shadow.
- Shapes, images and videos can have Outline, Background blur and Shadow.
- Pattern layers can have Shadow.
Each added decoration is a row with a checkbox to switch it off, a settings button and a cross to remove it. Use Add decoration under the list to add another kind. With part of a text selected, the decoration applies to that part only.
Blend sets how an object mixes with what is under it. It sits next to Opacity in the object's main section and offers 18 modes, from Normal, Multiply and Screen to Difference, Hue and Luminosity.
Deform, 3D and text on a path come from the presets library, not from the Shaders tab. See Presets and animators.
Background patterns
The Background tab in the left rail adds animated patterns, such as Mesh gradient, Lava lamp, Voronoi and Topography. Click a card and the pattern is added as a layer at the bottom of the stack, the size of the frame. With a pattern layer selected, clicking another card changes that layer's pattern instead of adding a new one.
A pattern is a layer, so shaders above it process it like anything else.
Shaders on format versions
Shaders follow the same rules as everything else on a format version. Change a shader's settings on a version and only that version changes; a dot next to the section title shows the override and takes it back to Main. See Edit Main and its versions.
Adding a shader layer on a version adds it to the whole family, like any object. Moving a shader onto an object or off it works only on the main artboard. On a version you get the message Move effects between layers in the main artboard.