Camera and 3D
Move a camera over the whole scene with stops, and give text a 3D shape such as a ring, sphere, stack or sheet.
The scene camera moves over everything at once: it pans, zooms, rotates and, with Pro, orbits in 3D. A 3D shape belongs to one text object and wraps its letters around a body, such as a ring or a sphere.
Add a camera
A project has one camera. It lives in the Camera row at the bottom of the timeline. Click the + button next to Camera (tooltip Add camera), and the Camera section opens in the inspector. To open it again later, click the camera row or strip. Enabled at the top of the section turns the camera off without losing its settings. Remove camera at the bottom deletes it.
The canvas shows the scene without the camera, so you can edit as usual. To see the shot, tick View through camera in the timeline header. While it is on, the canvas shows Viewing through camera — editing paused. Export always goes through the camera when it is enabled.
Stops: where the camera looks
The camera moves from stop to stop. Each stop is a card under Stops. A new camera has one stop showing the whole project; you can have up to 40. To add stops:
- Add stop adds one to the right of the last frame.
- Zoom to selection adds a stop at the playhead that frames the objects you selected. Select the objects first, then the camera, or the button stays greyed out (
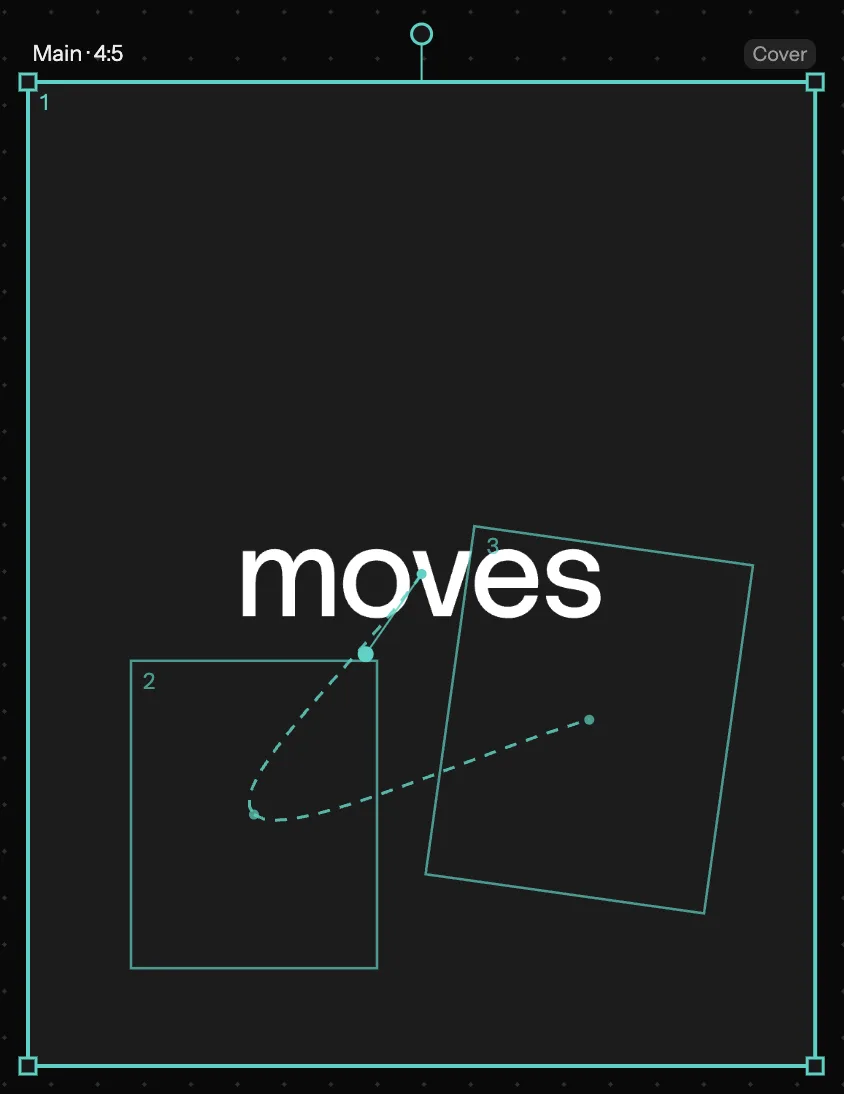
Select objects first, then the camera). The same command is in an object's right-click menu, where it also creates the camera if there is none. - Edit on canvas draws the stop frames and the camera path on the canvas. Click the dashed path to add a stop there. Drag the edge of a frame to move it, a corner to zoom, and the handle above it to rotate. Alt + click or double-click a frame removes the stop. Press Esc to leave the mode.
Frame or objects
The Target list on each stop decides what the frame is:
- Frame is a fixed shot. You set it with X, Y, Zoom and Rotation.
- Pick one or more objects and the stop follows them as they move. Padding sets the space around them, Softness smooths the follow, and Follow scale zooms with them when they grow or shrink. Unbind next to the list makes it a fixed frame again.
Timing and motion
Each stop after the first has Move, the time it takes the camera to get there, and Hold, how long it stays. Both start on Auto, timed from the distance. Set a value to override it; click Auto to go back. Pass through makes the camera fly through a stop without stopping.
Delay at the top of the section holds the camera on the first stop before the first move.
In the timeline, the camera strip shows moves as hatched pieces and holds as plain ones. Drag the strip to shift it in time, its ends to stretch it, and a border between pieces to change their lengths.
How the camera travels:
- Path is Straight, Arc or Spline, with Curve for the bend. A stop can have its own path.
- Motion is Ease with an Easing curve, or Spring with Stiffness and Damping.
- Zoom-out on long moves sets how far the camera pulls back during long moves.
- Background is In place or With camera: whether the background stays put or moves with the shot.
- On a looping project, Return to first frame brings the camera back to stop 1 before the loop starts again.
Camera presets
The Presets group at the end of the section builds stops for you. Push in goes from the whole frame to your objects, Pull out goes back out, and Word by word stops on each object in turn. Orbit circles around the objects, and Tilt-shift orbits at a steep angle with focus on the first one; both need Pro.
Presets use the objects you selected last, or all visible objects. They replace the stops and keep the other settings.
Depth, orbit and lens
All of these need Pro except Perspective. Without Pro the fields are greyed out next to a Pro chip; clicking the chip, or switching on Depth, Shake or Focus, opens the plans dialog.
- Orbit and Tilt on a stop turn the camera around the scene.
- Depth mode under Lens switches between Flat and Depth. In Depth, each object that is not pinned gets a Depth field under Pin to screen. With several objects selected, Spread in depth in the Selection section spaces them out, up to Range apart.
- Perspective sets how strong orbit, tilt and depth look.
- Shake adds camera movement, such as Handheld or Breathe.
- Focus blurs what is out of focus, with Aperture and Range.
Each format version can have its own camera. See What a version can change on its own.
Give text a 3D shape
3D shapes work on text only. The quickest way is a preset:
- Select a text object.
- Open Presets in the left rail and click the 3D filter chip.
- Click a card.
A text has one 3D shape, so a new card replaces the old one. Cards marked Pro open the upgrade dialog without Pro. To start from scratch, click Add animator in the Animators section and choose 3D under Layout. Either way, the 3D section appears in the inspector.
Adjust the 3D section
Shape picks the body, for example Ring, Sphere, Helix, Twisted bar, Stack, Cube or Sheet. Shapes marked Pro open the upgrade dialog. Without Pro, the Text tunnel card in the library gives you a 3D shape. Most shapes share these controls:
- Speed turns the shape (Roll speed on Twisted bar).
- Tilt X, Tilt Y and Tilt Z set the angle you see the shape from.
- Perspective sets how deep it looks.
- Depth tint shades the letters at the back toward the colour next to it.
- Back side shows, dims or hides letters facing away.
Then come the settings of the chosen shape. A ring or helix can get a solid Bar with a Twist. A Stack puts each line on its own block, with colours for Front, Sides and Caps. A Sheet has groups such as Wave and Body.
Inside shape puts other layers inside a wrapped shape (not Stack): the back half draws behind them, the front half in front. Remove 3D takes the shape off.
To turn letters in 3D without a shape, add a Flip X or Flip Y animator. Its 3D checkbox adds perspective, with Depth for its strength. These animators work on any object.